Garage Condo Build-Out Guide: Mezzanines, Lifts & What Adds Value
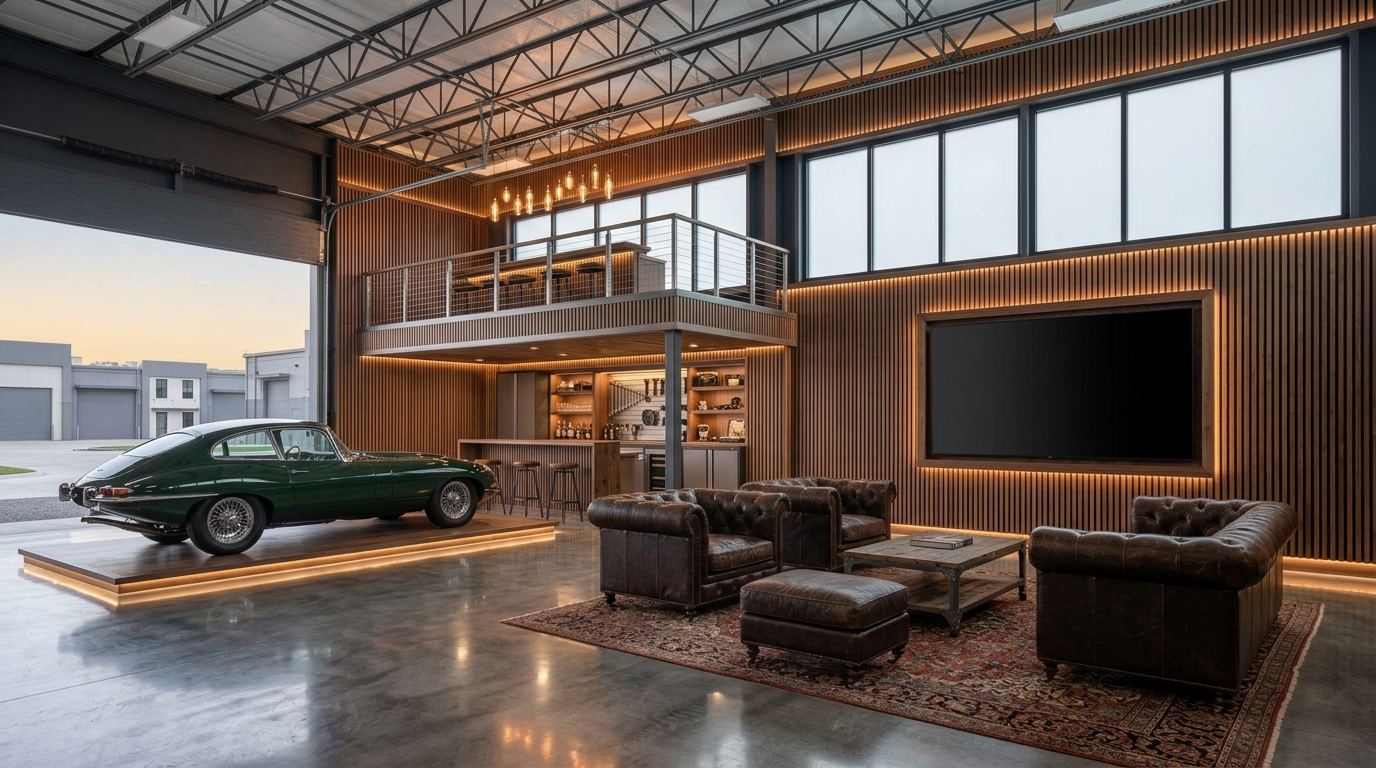
The day you close on a garage condo, you own a concrete shell: four walls, a slab, a big door, and possibilities. What you do next determines whether you end up with a parking spot that costs HOA dues or a finished second home for your machines that appraises, rents, and resells at the top of the community. This guide walks the build-out stage by stage with real cost ranges, shows how a typical $100K budget actually allocates, and, because this is where owners burn money, is blunt about what returns value at resale and what is a pure consumption purchase. If you have not bought yet, read this before you pick a unit: ceiling height, panel capacity, and plumbing stubs decided at purchase constrain everything below.
Start With the Shell You Bought
Before designing anything, audit what the developer delivered, because it varies wildly between communities. Document: clear ceiling height (the gatekeeper for lifts and mezzanines, you generally want 14–16 feet+ for a mezzanine over a parking bay); electrical service size and panel space (a 100A panel supports basic use; welders, EV charging, big compressors, and HVAC push you toward 200A); whether plumbing rough-ins exist for a bath (adding a sewer connection after the fact can be brutally expensive, if possible at all); slab thickness and condition (relevant for lift anchoring); and fire sprinkler layout (mezzanines and partition walls can trigger sprinkler modifications, a cost people never budget). Then get two documents before spending a dollar: the association’s architectural guidelines and your municipality’s permit requirements. More on both below.
The Stage-by-Stage Build-Out and What It Costs
Think in stages, each one usable and resale-coherent on its own, so you can stop at any point without owning a half-finished mess.
- Stage 1, Protect and light (the baseline): floor coating, wall paint or panels, LED lighting, basic storage. This is the highest-value-per-dollar stage and most owners should do all of it immediately.
- Stage 2, Power and climate: electrical upgrades, added circuits and outlets (ceiling drops, 240V for welders/EVs), and a mini-split heat pump. Climate control is what separates “storage” from “space you use.”
- Stage 3, Work capability: a two- or four-post lift, plumbed compressed-air lines, workbench and cabinetry runs, utility sink.
- Stage 4, Comfort: half bath (if rough-ins exist), insulation and drywall completion, ceiling fans, sound system.
- Stage 5, The mezzanine: structural steel platform, stairs, railing, and, optionally, a fully finished lounge, office, or guest-grade space above the cars.
| Improvement | Typical cost (2026) | Notes |
|---|---|---|
| Floor coating (epoxy/polyaspartic) | $5–$12 per sq ft | Polyaspartic costs more, cures faster, resists hot-tire pickup better |
| LED lighting package | $1,500–$5,000 | High-bay fixtures; aim for even, shadow-free coverage |
| Electrical upgrades | $2,000–$10,000+ | Circuits, 240V drops, subpanel or service upgrade at the top end |
| Vehicle lift (2- or 4-post) | $3,000–$8,000 installed | Verify ceiling height and slab spec before ordering |
| Mini-split HVAC | $3,000–$8,000 | Size for the insulated volume; multi-zone for mezzanine units |
| Plumbed compressed air | $1,500–$4,000 | Hard lines with drops beat dragging hoses forever |
| Half bath | $8,000–$15,000+ | Assumes rough-ins exist; far more without them |
| Mezzanine, structural steel | $20,000–$40,000 | Before finishes: platform, stairs, railing, engineering |
| Mezzanine, finished lounge | $75,000+ | HVAC extension, drywall, flooring, kitchenette, A/V |
Ranges are wide because unit sizes, local labor, and finish levels vary; treat the low end as functional-grade in an affordable market and the high end as premium-grade in an expensive one. For context on how build-out spend relates to total ownership cost, see the car condo cost guide.
Where a $100K Build-Out Budget Actually Goes
Owners doing a full single-phase build-out on a mid-size unit commonly land near six figures. Here is a typical allocation for a $100,000 project including a structural mezzanine:
Note what the chart implies: the mezzanine is a third of the budget by itself, before lounge-grade finishes. Skip it and a superb no-mezzanine build-out, floors, full electrical, climate, lift, air, bath, cabinets, lands around $50K–$65K on the same unit. That is the biggest fork in the road, and it should be driven by ceiling height, how you will actually use the space, and your community’s resale comps.
Permits and Association Approval: Do This First
Two gatekeepers stand between you and your plans, and both move slower than your contractor.
The municipality. Electrical work, plumbing, HVAC, and structural additions (any mezzanine) require permits almost everywhere. Mezzanines additionally require engineered drawings and can trigger occupancy-classification questions, especially if the space looks habitable, remember that sleeping in a garage condo is prohibited both by code use classifications and virtually every association declaration. Unpermitted work is not a shortcut: it surfaces at resale, in insurance claims, and in association disputes, and retroactive permitting costs more than doing it right.
The association. Most communities require architectural review before interior modifications that touch structure, utilities, or fire systems. Expect to submit drawings, contractor licenses and insurance certificates, and sometimes a construction deposit. Declarations commonly regulate working hours for contractors, dumpster placement, and anything penetrating demising walls or the roof (vents, flues, mini-split line sets). Get approval in writing before contracts are signed. The association is also, used well, an asset, more on that below.
What Returns Money at Resale, and What Doesn’t
Build-out spending splits cleanly into investments and consumption. Neither is wrong, but know which one you are doing.
Tends to return its cost (or better)
- Floor coating. The single best dollar in the building. Every buyer expects it; its absence reads as neglect.
- Climate control. In hot-humid and cold states, a mini-split moves a unit from one buyer pool into a much larger one.
- Electrical capacity. Panel space, 240V, and abundant outlets are invisible until a buyer needs them, then decisive.
- A half bath. Consistently one of the strongest differentiators in resale listings; units with baths sell faster and higher within the same community.
- Mezzanine structure. In high-ceiling units in premium communities, added usable square footage generally capitalizes well, the $20K–$40K steel usually shows up in the price.
Partial return
- Lifts. A lift returns value to the buyer who wants one and is furniture to the buyer who does not. The good news: lifts are removable and have a healthy used market, so treat them as equipment, not improvement.
- Cabinetry. Quality modular systems hold value; bespoke built-ins return a fraction of their cost.
- Finished lounge level. A $75K+ lounge adds real value in trophy communities, Florida’s and Texas’s top motorsports communities show huge spreads between shell and built-out resales, but in modest communities you can out-improve the neighborhood, the same mistake as building a $200K kitchen in a starter-home subdivision.
Mostly consumption
- Highly personal theming (team colors, murals, brand shrines), top-shelf A/V, golf simulators, saunas. Buy them because you will enjoy them, not because an appraiser will.
The resale rule of thumb: the closer an improvement is to infrastructure (power, climate, plumbing, structure), the better it returns; the closer it is to taste, the worse. If future rental income is part of your plan, infrastructure is also what tenants pay up for, see renting out your garage condo.
Design Ideas That Work
- The lounge. The classic mezzanine program: seating around a TV, kitchenette with bar fridge and sink, glass or cable railing so the cars stay in view, they are the art. Durable LVP flooring upstairs, not carpet.
- The office. A quiet conditioned mezzanine office with a window-wall over the bay is a legitimate daily workspace, and for owners running a business from the unit (where the declaration allows), it makes the whole asset work harder.
- The gym. Rubber flooring, a rack, and a fan corner at slab level or on the mezzanine. Cheap to execute, easy to remove, zero resale risk.
- The A/V and sim corner. Projector or large panel plus a racing simulator rig. Run conduit and power during the electrical stage even if the gear comes later, wiring is cheap during construction and ugly after.
Sequencing Mistakes That Cost Real Money
- Floors before dirty work. Coating the slab, then having plumbers saw-cut it for a bath, or welders drag steel across it for the mezzanine, is the most common and most expensive re-do. Floors go in after all trades that touch the slab.
- Lift before layout. Anchoring a lift, then realizing the mezzanine stairs or cabinet run wants that footprint. Design the full floor plan, even the phases you will not build for years, before anything is bolted down.
- Undersized electrical. Running the panel to capacity in phase one with no spare breakers means the phase-three mini-split needs a service upgrade. Build headroom when the walls are open.
- Mezzanine after finishes. Steel erection inside a finished, painted, coated unit is miserable and damaging. If a mezzanine is ever likely, build it first or rough-in for it (and confirm sprinkler implications) in phase one.
- Permits in parallel instead of in advance. Contractors scheduled before association and municipal approvals clear end up billing you for idle weeks.
Working With the Association, Not Around It
Beyond approvals, the association is your best contractor-vetting resource: boards and managers know which electricians and epoxy crews have already worked in the buildings, carry the required insurance, and respect the rules. Ask for the list. Walk neighbors’ units, owners love showing off build-outs, and you will learn what works in your exact floor plate before paying for the lesson. And keep every approval letter and permit card in a file; a documented build-out package is a genuine selling tool at resale, right next to the deed. If your community isn’t in our directory yet, add it, buyers searching by state and on the map should be able to find it.
Insurance Implications of a Build-Out
The association’s master policy typically covers the building shell; everything you add, coatings, mezzanine, bath, cabinetry, lift, A/V, is yours to insure under your unit-owner policy’s improvements-and-betterments coverage. After a major build-out, call your agent and raise that limit to replacement cost of the improvements; a $100K build-out insured under a default $10K–$25K improvements limit is a five-figure mistake waiting on a fire. Lifts and compressors may need to be scheduled separately as equipment. Business use in the unit requires a commercial policy or endorsement, a personal unit-owner policy can deny a claim arising from commercial activity. And unpermitted structural work can give any insurer an exit; one more reason the permit file matters. If you financed the unit, your lender may also require evidence of coverage on major improvements, our financing guide covers lender requirements in detail.
Bottom Line
Build in stages, infrastructure first: floors, light, power, climate, then capability, then comfort, then the mezzanine if the ceiling and the community justify it. Spend confidently on anything a future buyer or tenant will pay for, and knowingly on anything only you will love. Get the association and the permit office on your side before the first contractor arrives, re-paper your insurance after the dust settles, and your build-out will be the reason your unit tops the comps instead of the cautionary tale the board tells new owners.
Frequently asked questions
How much does a garage condo build-out cost?
Typical ranges: basic (epoxy, lighting, storage) $15K–$40K; mid-level (mezzanine, half bath, mini-split climate) $50K–$120K; showpiece build-outs with full lounges, kitchens and A/V run $150K–$300K+.
Do I need permits to finish a garage condo?
Usually yes for anything structural, electrical, or plumbing — mezzanines, bathrooms, panel upgrades. The association typically requires approval of plans too. Unpermitted work can bite you at resale.
What garage condo upgrades add the most resale value?
The market consistently pays for: climate control, a bathroom, a code-compliant mezzanine, upgraded electrical service, and quality lighting/epoxy. Highly personal theming returns the least.